What is AI Studio?
AI Studio is Soundverse’s built-in Collaborative Audio Visual Environment (CAVE) with generative capabilities. Think of it as a fully-featured recording and mixing environment that runs entirely in your browser. No downloads, no installations. Whether you’re a first-time creator or a seasoned producer, AI Studio gives you everything you need to record vocals, layer music tracks, add a video score, or collaborate live with teammates — all in one place.Features
- Browser-Based DAW: No heavy installations required; everything runs in the cloud.
- AI Integration: AI tools generate audio, image, and video directly onto the grid of the timeline — your clips appear instantly in place, ready to arrange and mix.
- Multi-Track Editing: Layer multiple audio, video, and image tracks simultaneously.
- Real-Time Collaboration: Invite teammates to edit the same project at the same time.
- Cloud Asset Management: All your recordings, AI-generated clips, and uploads are saved and accessible from one place.
What Can You Make?
Getting Started
Create a Project
1
Find AI Studio in the Sidebar
In the left sidebar, look for the AI Studio option and click it to open the studio.
2
Create a New Project
Once inside, click New Project to start a fresh, empty multi-track canvas.
3
Rename Your Project
You can rename your project at any time by clicking on the project name. There are no templates — every project starts blank.
Open an Existing Project
1
Open the Sidebar
In the left sidebar, navigate to the Library panel.
2
Go to the Projects Tab
Inside the Library panel, open the Projects tab to see all your saved AI Studio projects.
3
Click to Open
Click on any project to open it. The studio will restore all your tracks, assets, and the last saved state of your timeline automatically.
Studio Interface Overview
Here’s what the AI Studio interface looks like: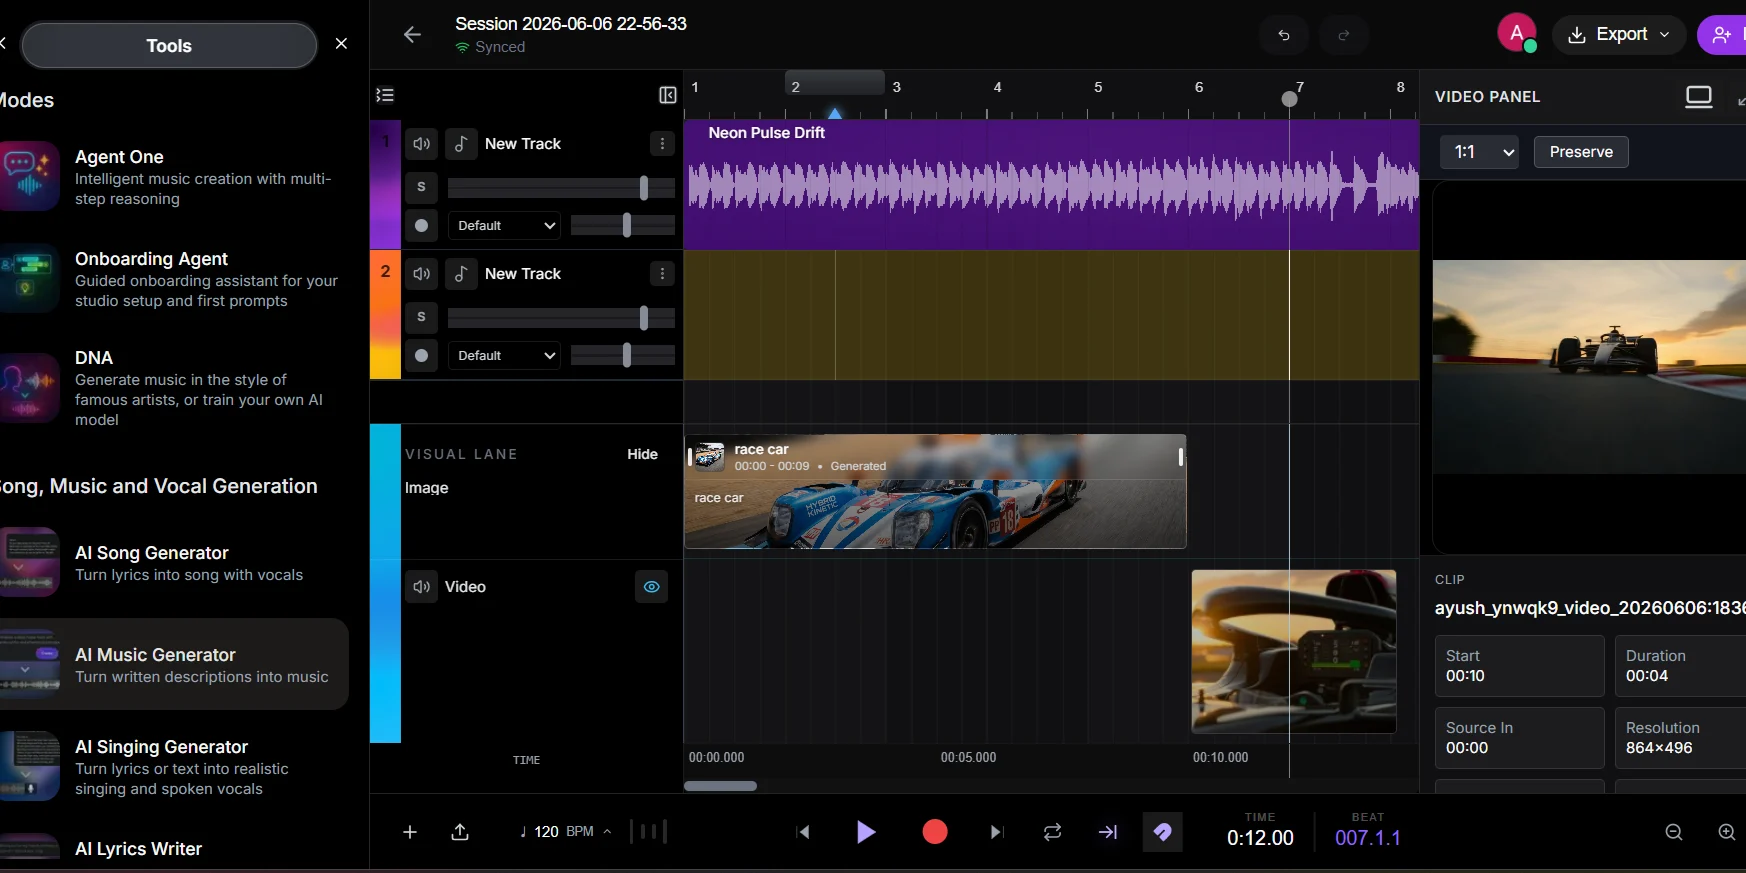
The studio also has two bars running across the top and bottom of the screen:
- Top Bar: Houses project-level actions — collaboration invites, sharing settings, and export options.
- Bottom Bar: Contains all playback controls — Play, Pause, Record, and the Metronome toggle — so you can control your session at any time.
Core Concepts
Projects
A project is the container for everything in your session — your timeline, all tracks, and references to every asset you’ve used. Projects auto-save to the cloud and stay synced with all collaborators in real-time. You can adjust project-wide settings from the Top Bar:- BPM (Beats Per Minute): The tempo of your project.
- Time Signature: How beats are grouped (e.g., 4/4 is standard for most popular music).
- Sharing & Permissions: Control who can view or edit your project.
Timeline
The Timeline is your main working canvas. Time flows from left to right — the further right a clip is, the later it plays.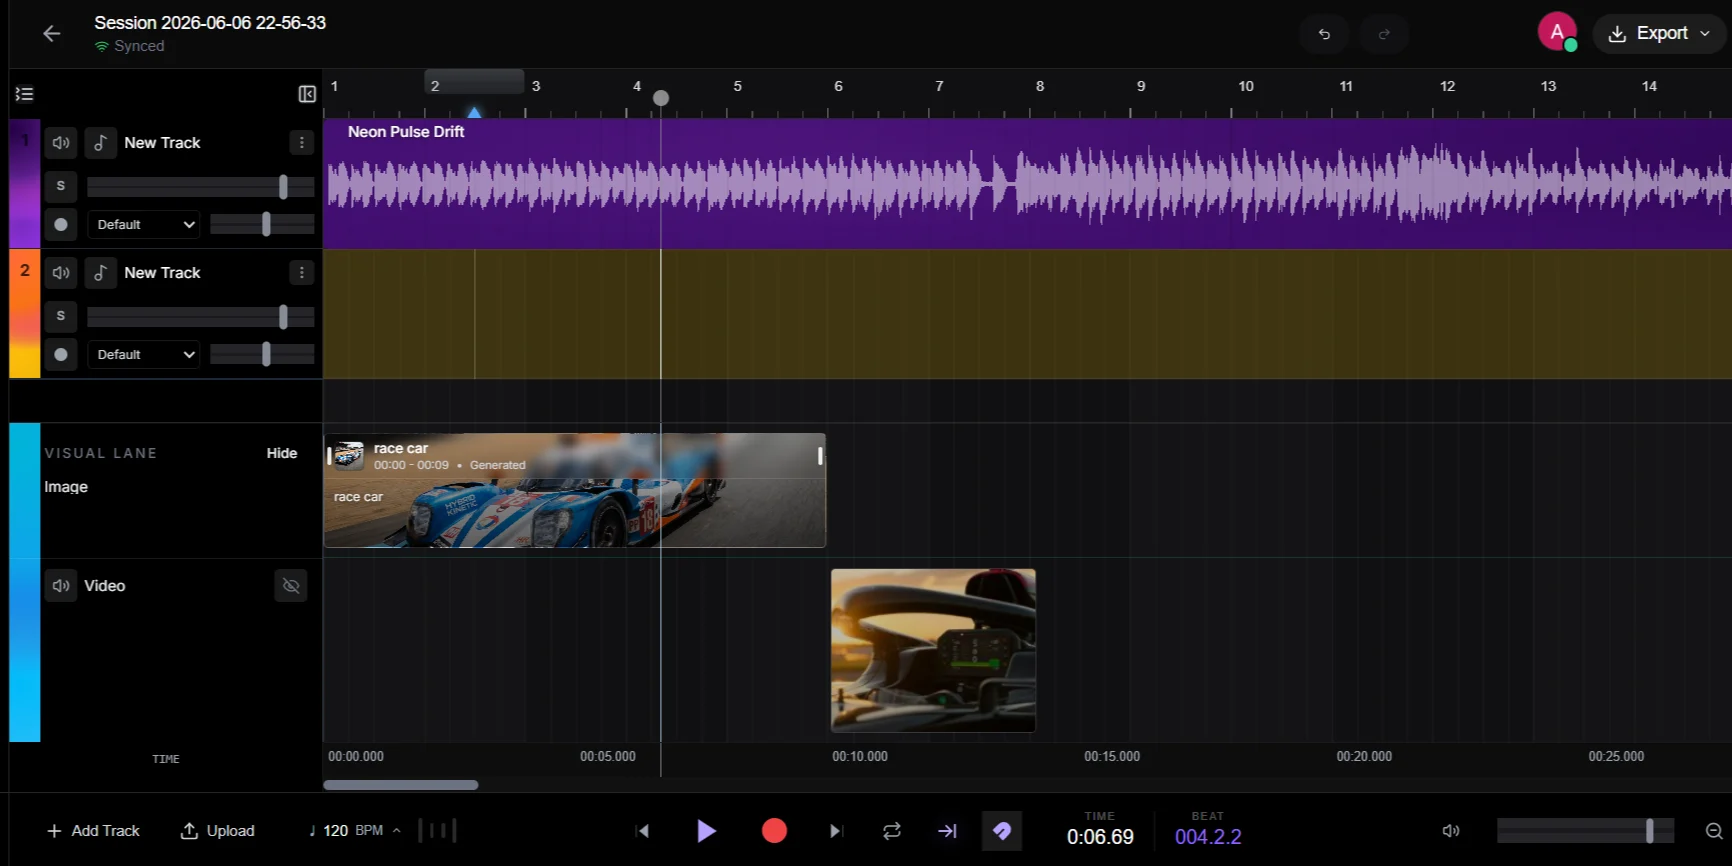
Key Timeline Controls
- Playhead: The vertical line that marks where playback is currently happening. Click anywhere on the ruler at the top to jump to that moment.
- Zoom In/Out: Use the zoom slider or scroll wheel (with a modifier key) to get a close-up or a bird’s-eye view of your timeline.
- Snapping: When enabled, clips will snap to the nearest beat or second as you drag them — great for keeping everything rhythmically aligned.
Tracks
Tracks run horizontally across the timeline. Each track holds one type of media. Think of each track as a separate “layer” of your final mix.Audio Tracks
Used for vocals, instruments, sound effects, and AI-generated music stems. Each audio track has its own volume, mute, and solo controls in the track header on the left.Video Track
A dedicated track for your reference video. It is helpful for scoring, dubbing, or sound design work. The video plays in sync with the playhead inside the Preview Panel on the right. You can import a video from your device or generate one using Soundverse’s AI tools.AI Studio supports one active video track at a time.
Image Track
Place static images on the image track — great for podcast cover art, storyboarding, or visual context for your session. You can import images from your device or generate them using Soundverse’s AI tools. Stretch image clips to define how long they stay on screen.Assets
Assets are your raw media files — audio (WAV, MP3), video (MP4), or images (PNG, JPEG) — whether uploaded manually or generated by Soundverse AI. The Asset Library lives in the left sidebar and organizes everything into:- Folders — Your own organization structure.
- AI Generations — Every clip Soundverse’s AI has created for you.
- Uploads — Files you’ve imported from your device.
| Previous Projects | Audios |
|---|---|
 |  |
Working with Audio
Adding Audio to the Timeline
- Find your clip in the Asset Library on the left sidebar.
- Drag and drop it onto an existing Audio Track, or drop it onto the empty space below all tracks to automatically create a new track.
Editing Audio Clips
Right-click on any clip to select it, which reveals edit handles and opens the clip’s properties.Trimming & Splitting
- Trim: Hover over the left or right edge of a clip. When the trim cursor appears, drag to shorten or extend the clip.
- Split: Move the playhead to the exact moment you want to cut, right-click the clip, and select Split. This divides one clip into two independent pieces.
Looping Clips
Drag the loop handle (found at the top-right corner of a clip) to repeat it seamlessly. This is especially useful for drum loops or AI-generated beats that you want to play continuously in the background.Volume Controls
- Track Volume: Use the volume slider on the left-panel track header to control the overall level of that track.
- Clip Gain: Select an individual clip and open the Properties panel to fine-tune its volume independently from the rest of the track.
Mute & Solo
- Mute (M): Silences just that track. Useful when you want to hear your mix without one element.
- Solo (S): Mutes all other tracks so you can hear only the soloed track in isolation. Great for checking if a specific part sounds right.
Working with Video
Adding Video
Drag a video file from the Asset Library and drop it onto the dedicated Video Track, or generate a video directly using Soundverse’s AI video generator.Trimming & Splitting Video
You can trim and split the video clip the same way as audio. Additionally, the audio track embedded in the video file can be detached into a separate audio track for independent mixing — so you can mute the original audio and replace it with your own.Previewing Video
Make sure the Right Panel (Preview) is visible. As the playhead scrubs through the timeline, the video will update in real-time — allowing frame-accurate synchronization between your audio and video.Syncing Audio to Video
Use the waveform of the detached video audio as a visual guide. Align your custom sound effects or voiceover by matching them to the peaks and valleys you can see in the waveform.Working with Images
Adding Images
Drag an image from the Asset Library onto the Image Track, or generate one using Soundverse’s AI image generator. This is handy for podcast cover art, visual storyboards, or setting a visual scene.Creating a Slideshow
Place multiple images sequentially on the image track to create a slideshow effect that plays in sync with your audio.Controlling Image Duration
Drag the left or right edge of an image clip to make it appear on screen for a longer or shorter time.Image Preview
All images render in the Preview Panel on the right, respecting the timing you’ve set on the timeline.Recording
You can record directly into AI Studio from your microphone or any connected audio interface.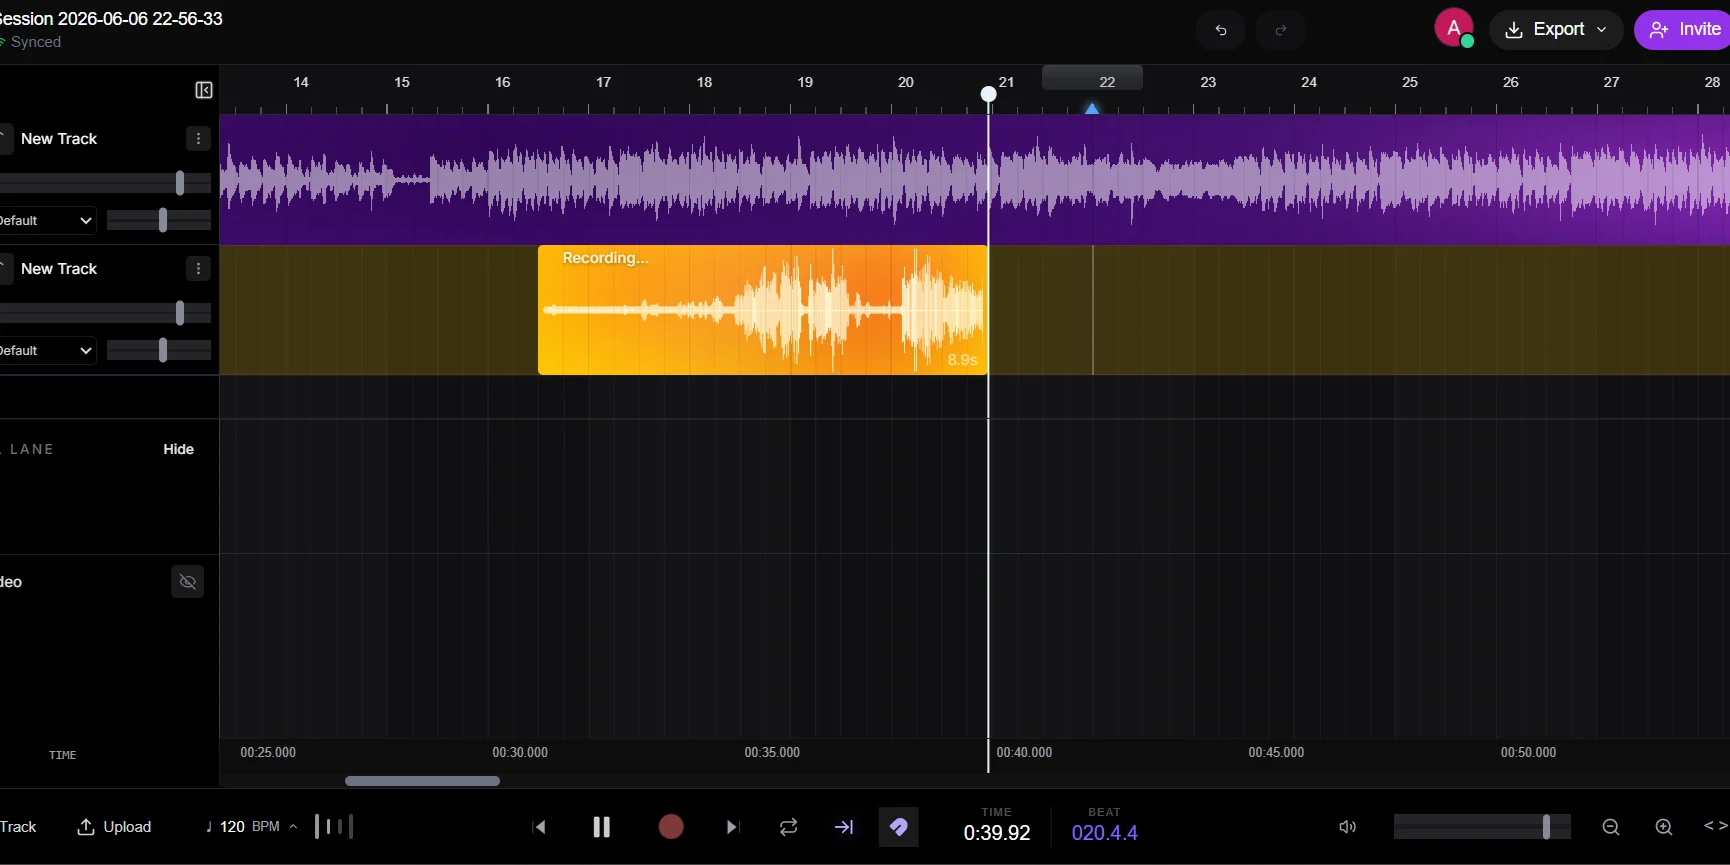
How to Record Audio
1
Select Your Input
Click the settings gear on a track header, or open the Properties panel, and choose your microphone or audio interface input.
2
Arm the Track
Click the Record Arm button (the red circle icon) on the track you want to record into. An armed track is “listening” and ready to capture your audio.
3
Press Record
Move the playhead to your desired start point, then click the master Record button in the top navigation bar. A metronome count-in will play (if enabled) before recording begins.
4
Monitor Your Input
Enable input monitoring to hear yourself through AI Studio as you record.
Common Recording Workflows
Recording Vocals Over a Beat
- Import or generate an AI instrumental from Soundverse and add it to an audio track.
- Create a new empty audio track for your vocals.
- Arm the vocal track and press Record.
Recording a Podcast or Voiceover
- Arm a single audio track.
- Press Record and start speaking.
- After recording, use the Trim and Split tools to remove mistakes, long pauses, or breaths.
Dubbing a Video
- Import your video onto the Video Track.
- Open the Preview Panel on the right.
- Arm an audio track for your voiceover.
- Press Record and speak while watching the video play — your audio and video stay in sync automatically.
Collaboration
AI Studio supports real-time multiplayer editing — multiple people can work on the same project at the same time.Inviting Collaborators
You can easily invite others to your project to work together in real time.1
Open the Invite Modal
Click the Invite button in the top right corner of AI Studio.
2
Send an Email Invite
Type the email address of your collaborator, choose their access level (Editor, Viewer, or Admin) from the dropdown, and click Invite.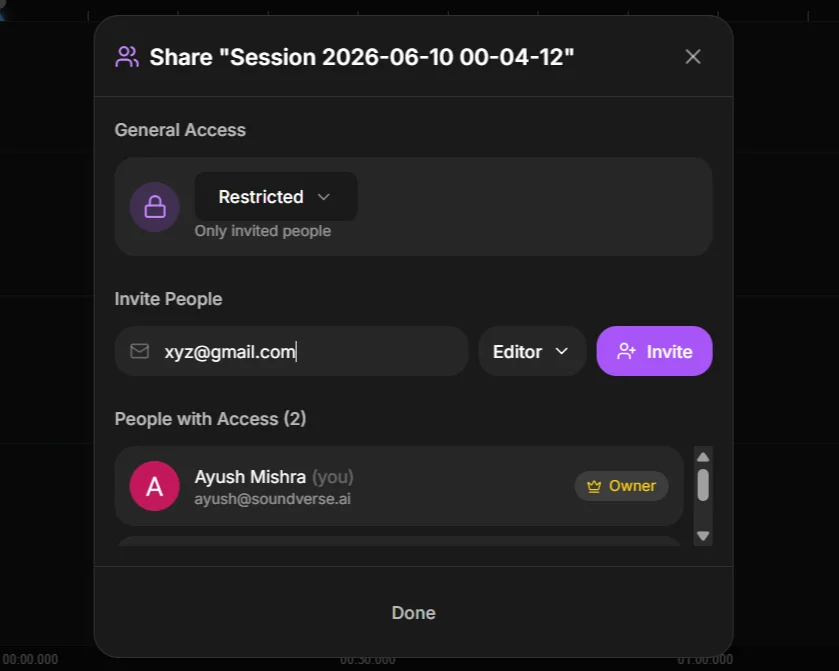
3
Share via Link (Optional)
Alternatively, you can change the General Access from “Restricted” to “Anyone with link” and click Copy link to share it directly via chat or social media.
Roles & Permissions
For Edu/Enterprise Workspaces: Sharing permissions may be governed by your Workspace Administrator’s Walled Garden policies.
Project History & Conflict Resolution
Every action is tracked. You can undo and redo changes at any time. If two collaborators edit the same clip at the exact same moment, AI Studio resolves the conflict automatically — no data loss.Multi-Channel Input Support
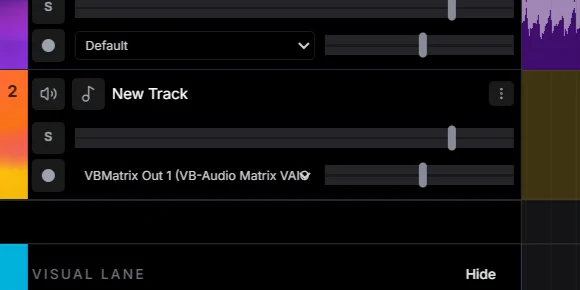
Multi-Channel Input Support is an advanced feature for creators who use external audio interfaces, digital mixers, or complex studio setups.Not sure if you need this? If you’re just recording with a standard USB microphone into your laptop, you don’t need this. This feature is meant for setups with multiple microphones, mixers, or situations where your instrument is plugged into a higher-numbered channel on your interface.
Routing Complex Setups
If you have a microphone or instrument plugged into a higher-numbered input on your mixer (like Channel 3, Channel 24, etc.), you can use Virtual Audio Routing Software to seamlessly bring those signals into AI Studio. By using a virtual audio router, you can easily reroute the physical input of your interface into a clean, selectable audio source that AI Studio can detect on Channel 1.Supported Software
Based on your operating system, you can use the following virtual audio routing tools to achieve this:- Windows: Voicemeeter Banana, Voicemeeter Potato, VB-Audio Matrix
- macOS: Loopback, BlackHole
How to Connect
1
Connect Your Interface
Plug your multi-channel audio interface or mixer into your computer via USB.
2
Reroute via a Virtual Audio Interface
If your external mixer doesn’t appear as individual channels in the browser, use a virtual audio router (such as VB-Audio Matrix) to reroute your mixer’s physical inputs to virtual output channels — for example, mapping your mixer’s Channel 24 to Virtual Output 1, so AI Studio can see it as a clean, selectable input.
3
Set Browser Permissions
Select your interface (or virtual audio device) as the audio input when your browser asks for microphone permission.
4
Assign Channels in AI Studio
Open the Input Selection menu on each track and assign the specific channel you want that track to capture.
Recommended Setups
Exporting Your Work
When you’re done, export your project in the format you need.Audio Export
Click Export → Audio. Choose your format:- WAV — Lossless, highest quality. Best for professional use or further editing.
- MP3 — Compressed, smaller file size. Good for sharing or uploading to streaming platforms.